


Install and configure WordPress on Ubuntu
There’s nothing groundbreaking here, just another routine installation of WordPress on Ubuntu from scratch on a hosted VPS. But this time, I noticed an additional cost for IPv4 during the cloud provider’s checkout. So, why not spend a day struggling with the IPv6 setup, which is free, and save 50 cents a month? Totally worth it!
Virtual Private Server with IPv6 public domain
It got me curious, so I embarked on another side quest to uncover why IPv4 has become a paid feature. As I dug deeper, I discovered that IPv4 addresses have become a scarce resource due to their finite supply and the exponential growth of internet-connected devices. With a total pool limited to about 4.3 billion addresses, what once seemed sufficient in the early days of the internet has now proven inadequate as the internet has expanded globally. This scarcity has, in turn, led to a thriving market where IPv4 addresses are bought, sold, and leased at increasingly high prices.
Reasons for IPv4 Being Paid:
- Finite Supply: IPv4 addresses are limited, and most of the available addresses have already been allocated. As a result, new organizations or those needing more addresses must obtain them from the secondary market.
- High Demand: The demand for IPv4 addresses remains high, driven by legacy systems and the slow adoption of IPv6, despite its vast address space.
- Market Dynamics: The scarcity of IPv4 addresses has turned them into a valuable commodity. Prices for IPv4 addresses have risen significantly over the years, with individual addresses being sold for $44 to $60 each in 2023. This increase is driven by the basic economic principle of supply and demand.
- IPv6 Transition Challenges: While IPv6 offers an abundant supply of addresses, the transition from IPv4 to IPv6 has been slow due to the cost and complexity of upgrading infrastructure. This slow transition has maintained the high demand for IPv4.
Comparison with IPv6:
- IPv6 Availability: IPv6 addresses are virtually unlimited and are generally available for free because the address space is so vast that there is no scarcity. The challenge with IPv6 lies more in its adoption rather than its availability.
These factors collectively contribute to the current scenario where IPv4 addresses are a paid and valuable commodity, while IPv6 addresses remain free and plentiful, waiting for broader adoption.
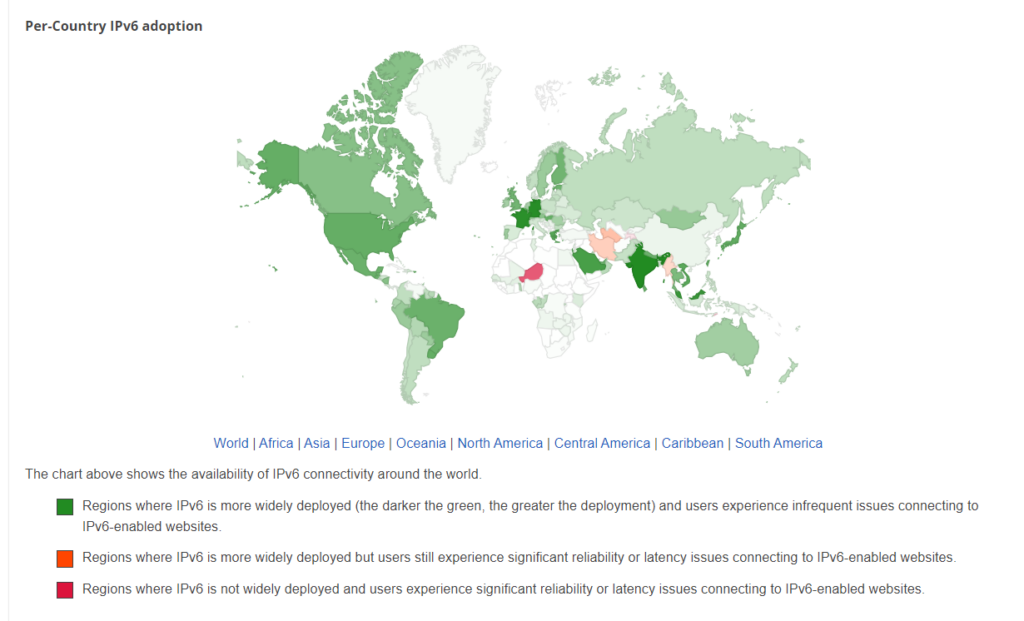
The primary challenge with IPv6 is that it has not yet achieved full global adoption. Currently, only about half of the world’s internet infrastructure supports IPv6. This slow adoption is due to several factors, including the cost of upgrading equipment, the need for widespread coordination among internet service providers (ISPs), and the lack of immediate incentives for companies that are still able to operate effectively using IPv4.
Full adoption of IPv6 is expected to take several more years, possibly even a decade or more. The transition is gradual because IPv4 and IPv6 need to coexist during the migration period, which adds complexity. However, as the pool of available IPv4 addresses continues to shrink and the demand for more internet-connected devices grows, the pressure to adopt IPv6 will increase. Some regions and organizations are making faster progress, but global adoption will require continued efforts in education, infrastructure investment, and policy support.
If you’re planning to build a webpage focused on a local market where IPv6 is fully adopted, the choice between IPv4 and IPv6 might not be a critical factor. In such cases, your site will likely operate smoothly regardless of the protocol used, as the local infrastructure can handle both IPv4 and IPv6 seamlessly.
However, it’s still a good practice to ensure your website supports IPv6. This not only future-proofs your site as IPv6 adoption continues to grow but also improves accessibility for users in regions or networks that rely more heavily on IPv6. Additionally, search engines like Google consider IPv6 support as a positive factor for SEO, which could benefit your site’s visibility.
Overall, while your local market’s full adoption of IPv6 might make the immediate choice seem less impactful, supporting both protocols is a strategic move that aligns with the ongoing global transition to IPv6.
Update and upgrade system
Before we start entering various commands, we need to update our system. This is one of the reasons I really like Ubuntu and, in general, all Linux-based systems (linux distributions, dist, distros or whatever you call it). You don’t have to download anything manually; everything can be installed via the terminal, which is both quick and reliable.
Also ubuntu has own tutorial on how to install WordPress on you ubuntu machine so you can have a go and read over that as well. The difference is that I add many comments and detailed explanations around every step and will not only set up WordPress but also configure DNS records and, on top of that, use IPv6. To see a concise but great tutorial, you can head over to Ubuntu’s page.
Even though you’ve just deployed the server instance, we still need to fetch the latest information about the available packages from the repositories configured on our system.
If you are logged in as the root user, you do not need to use the “sudo” (superuser do) command.
sudo apt update
This command fetches the latest information about the available packages from the repositories configured on your system.
Why It’s Necessary:
- Current Package Information: The command ensures that your system knows about the latest versions of software available. This is essential for security patches, bug fixes, and feature updates.
- Dependency Management: Some new versions of packages may depend on updated versions of other packages. By updating the package list, you ensure that these dependencies are correctly identified.
sudo apt upgrade
his command actually installs the updates for the packages on your system that have newer versions available.
Why It’s Necessary:
- Security: Regularly upgrading packages ensures that you receive important security patches that protect your system from vulnerabilities.
- Stability and Performance: Updates often include bug fixes and performance improvements, which help keep your system running smoothly and efficiently.
- New Features: Some updates include new features or enhancements, keeping your software up-to-date with the latest capabilities.
If you feel like you’re already a pro, you can run these commands in one line.
sudo apt update & sudo apt upgrade
You can also add -y option at the end to not bother you with any questions i.e.
Do you want to continue? [Y/n]
Install Apache Web Server for WordPress
Apache is a popular web server, and literally I have never used another one, used to serve web applications. Install it using:
sudo systemctl status apache2
To check if Apache is running, enter:
sudo systemctl status apache2
Install MySQL database for WordPress
For our installation, I will use MySQL since it is a widely-used database management system. Alternatively, you can use MariaDB, or if you’re up for a bit more of a challenge, you can opt for PostgreSQL (though WordPress does not natively support PostgreSQL, so you’ll need to install a bunch of additional components to make it work).
sudo apt install mysql-server
sudo mysql_secure_installation
Follow the prompts to set a root password and secure your installation.
Create a MySQL Database and User for WordPress
Log in to the MySQL shell:
sudo mysql -u root -p
Then, create a database and user for WordPress:
CREATE DATABASE wordpress;
CREATE USER 'wordpressuser'@'localhost' IDENTIFIED BY 'password';
GRANT ALL PRIVILEGES ON wordpress.* TO 'wordpressuser'@'localhost';
FLUSH PRIVILEGES;
EXIT;
Replace password with a strong password of your choice.
Install PHP and extensions for WordPress
WordPress is written in PHP, so you need to install PHP along with some necessary extensions:
sudo apt install
php \
libapache2-mod-php \
php-mysql \
php-curl \
php-xml \
php-json \
php-mbstring\
php-zip \
php-gd
This command installs several PHP packages and modules necessary for running WordPress on an Ubuntu system. Each package serves a specific purpose in supporting WordPress functionality.
Essential Packages:
- apache2
- Purpose: Web server that serves your WordPress site.
- libapache2-mod-php
- Purpose: Integrates PHP with Apache, enabling Apache to process PHP files.
- mysql-server
- Purpose: Database server used by WordPress to store and retrieve data.
- php
- Purpose: The scripting language that WordPress is written in.
- php-mysql
- Purpose: Allows PHP to communicate with the MySQL database.
Highly Recommended Additional Packages:
These packages are not strictly required, but they are commonly used and highly recommended because they provide important functionality that many WordPress themes and plugins rely on:
- php-curl
- Purpose: Enables PHP to communicate with other servers, necessary for many plugins and features like API calls.
- php-mbstring
- Purpose: Allows PHP to handle multibyte strings, which is important for internationalization (supporting different languages).
- php-xml
- Purpose: Provides XML parsing capabilities, necessary for handling RSS feeds, imports, and other XML-based data.
- php-zip
- Purpose: Enables PHP to work with ZIP archives, useful for plugin/theme installation and backups.
- php-json
- Purpose: Allows PHP to encode and decode JSON, which is widely used in web applications and by WordPress’s REST API.
Optional but Useful Packages:
These packages are not required but may be useful depending on your specific needs or the functionality of the WordPress site:
- php-imagick
- Purpose: Provides advanced image manipulation capabilities, useful for themes or plugins that require more complex image handling.
- php-intl
- Purpose: Enables PHP to support internationalization, necessary for sites with multilingual content or specific locale formatting.
- php-bcmath
- Purpose: Provides arbitrary precision arithmetic, useful for plugins that require high precision calculations, such as some e-commerce plugins.
- ghostscript
- Purpose: Provides PDF and PostScript interpreter, which may be required by certain plugins or for specific tasks like PDF generation.
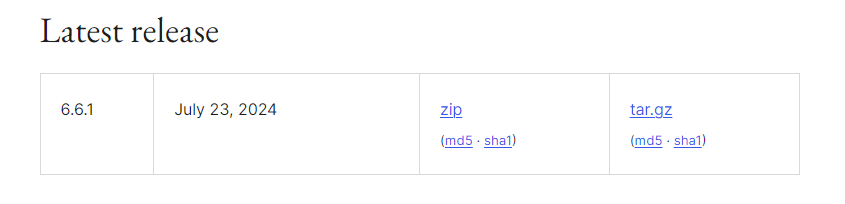
Download WordPress tar.gz archives
You can download the latest WordPress Linux archive files (tar.gz) from https://wordpress.org/download/releases/.
If you do not want to move files over SFTP, you can directly download the latest release using the built-in curl command.
cd /var/www/html
sudo curl -O https://wordpress.org/latest.tar.gz
I recently learned that if you’re paranoid about security, you should check to ensure there’s no man-in-the-middle attack by comparing the checksums of the downloaded archive file.
WordPress provides a checksum file (usually an MD5 or SHA256 checksum) that you can use to verify the integrity of the downloaded archive.
You can download the checksum file with the following command:
sudo curl -O https://wordpress.org/latest.tar.gz.md5
Or if the above method doesn’t work—like it didn’t for me—you can always type the URL directly into your browser. Instead of wasting my time trying to fix why curl didn’t work, I simply headed to the page and downloaded the file using the good old-fashioned download link action.
If both curl commands worked, you should now have the archive file and the checksum file. Next, we need to verify that the checksum matches.
md5sum -c latest.tar.gz.md5
If you want to compare it with your very own eyers you can run the command:
md5sum wordpress-6.6.1.tar.gz
This command will print the checksum to your console output i.e.
a15f676931133623b7b347f1fabc966b
You can compare the checksum with what you find on the WordPress download page.
Configure Apache for WordPress
Set the correct ownership for the web directory /var/www/wordpress to:
sudo chown -R www-data:www-data /var/www/wordpress/
sudo chmod -R 755 /var/www/wordpress/
Create an Apache configuration file for your WordPress site:
cp /etc/apache2/sites-available/000-default.conf wordpress.conf
If you are connected to the server via visual studio code (VSC) remote explorer extension open the newly created config in VSC
<VirtualHost *:80>
    DocumentRoot /var/www/wordpress
    <Directory /var/www/wordpress>
        Options FollowSymLinks
        AllowOverride Limit Options FileInfo
        DirectoryIndex index.php
        Require all granted
    </Directory>
    <Directory /var/www/wordpress/wp-content>
        Options FollowSymLinks
        Require all granted
    </Directory>
</VirtualHost>
Enable the configuration by command:
sudo a2ensite /etc/apache2/sites-available/wordpress.conf
Also we need to disable the 000-default.conf if its enabled. If we do not do that the default config will prevail and our page wont load.
sudo a2dissite /etc/apache2/sites-available/000-default.conf
Everytime you run the command you will need to reload configuration
If not enabled mod rewrite or just in case run following command
sudo a2enmod rewrite
Restart apachche
sudo systemctl restart apache2
The mod_rewrite module in Apache is a powerful tool that WordPress uses primarily for creating clean, user-friendly URLs, often referred to as “pretty permalinks.”
If you do not care what it the mod rewrite is and why it is used you can skip to the next section.
What is mod_rewrite?
mod_rewriteis an Apache module that allows you to rewrite URLs on the server. It provides a flexible and powerful way to manipulate URLs, making them more readable and SEO-friendly.
Why Does WordPress Use mod_rewrite?
- Pretty Permalinks:
- Purpose: WordPress uses
mod_rewriteto convert URLs into a more human-readable format. Instead of URLs likehttps://example.com/?p=123, WordPress can generate URLs likehttps://example.com/about-us/. - Benefit: These “pretty” URLs are easier to read, more memorable, and better for search engine optimization (SEO).
- Purpose: WordPress uses
- SEO Benefits:
- Search engines prefer URLs that are descriptive and easy to understand. Using
mod_rewrite, WordPress can create URLs that include keywords from the post titles, which can improve your site’s SEO.
- Search engines prefer URLs that are descriptive and easy to understand. Using
- User Experience:
- URLs that describe the content of the page (e.g.,
/about-us/instead of/?page_id=2) provide a better user experience. Visitors can often guess the content of the page just by looking at the URL.
- URLs that describe the content of the page (e.g.,
- Security and Redirection:
- Although not its primary function in WordPress,
mod_rewritecan also be used to create redirections, enforce HTTPS, or hide the real structure of your site’s files, which can add an additional layer of security.
- Although not its primary function in WordPress,
If all the previous steps are correct, you can check if you get the installation page for WordPress. Note that if you’re using an IPv6 address, you’ll need to wrap it in [] brackets.

Securing the WordPress domain with SSL
Before we jump into installing certificates, you need to set an AAAA record where your domain is registered. For example, with Hetzner Cloud, my public IPv6 address looked like xxxx:xxx:xxx:xxxx::/64. However, to connect our domain with this public IPv6, we need to use xxxx:xxx:xxx:xxxx::1 when setting the AAAA record to link it to our server.
Use of
xxxx:xxx:xxx:xxxx::1: It’s a common practice to assign the first or another easily memorable address within your/64subnet to your server or service.
Once everything is set up, we can install Certbot and proceed to install our SSL certificates.
sudo apt install certbot python3-certbot-apache
certbot: The main Certbot package that automates the process of obtaining and renewing SSL certificates.python3-certbot-apache: The plugin that integrates Certbot with Apache, allowing for automatic configuration of SSL.
Run the Certbot command to obtain an SSL certificate.
sudo certbot --apache
Follow the prompts:
- Certbot will ask for your email address, which is used for urgent renewal and security notices.
- You’ll need to agree to the terms of service.
- Certbot will also ask if you want to redirect all HTTP traffic to HTTPS. It’s recommended to choose this option to ensure that your site is always served securely.
When all successfully done you might notice slight changes to your Apache configuration and also new SSL configuration file is created under the /etc/apache2/sites-available
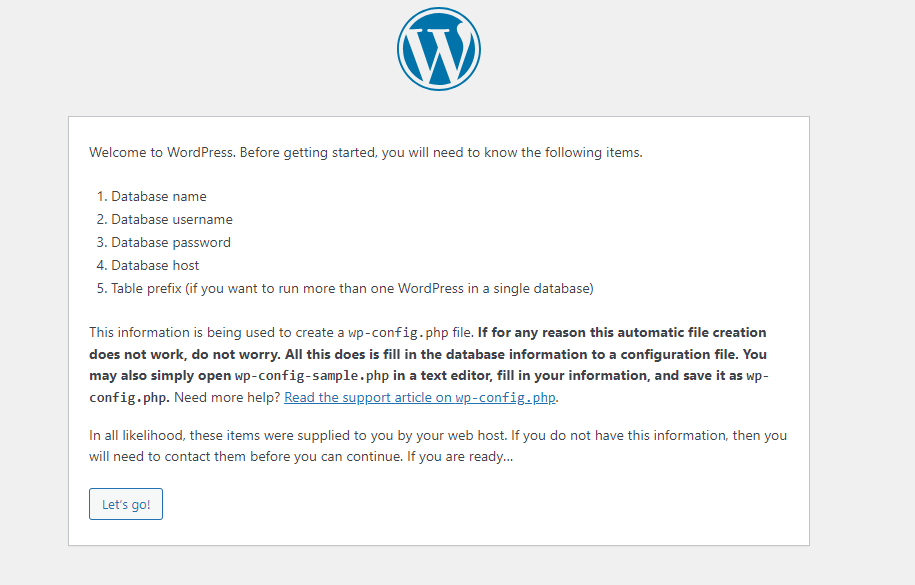
Running the WordPress Installation Wizard After Server Configuration
When you navigate to the freshly copied WordPress files on your server, and your Apache and DNS configurations have been correctly set up, you will be greeted by the WordPress installation wizard.
Going through it should be a piece of cake now that we’ve completed the entire setup!
Configuring email service (SMPT) on WordPress
After the installation the email service is not configured for our WordPress and thus no email is sent when you register new user or want to reset your password.
Option 1: Configure PHP mail() Function
WordPress uses the PHP mail() function by default, which can work well if your VPS is correctly configured to send emails. However, this method might have issues with reliability and deliverability.
Steps to Configure PHP mail():
- Ensure
sendmailis Installed- Most Linux distributions use
sendmailor a similar MTA (Mail Transfer Agent) by default. Ensure it’s installed:
- Most Linux distributions use
sudo apt-get install sendmail
Start and enable the service
sudo service sendmail start
sudo systemctl enable sendmail
- Test Email Sending
- Create a simple PHP script to test if the
mail()function is working
- Create a simple PHP script to test if the
<?php
$to = 'recipient@example.com';
$subject = 'Test Email';
$message = 'This is a test email from your VPS.';
$headers = 'From: your-email@yourdomain.com' . "\r\n";
if (mail($to, $subject, $message, $headers)) {
    echo 'Email sent successfully.';
} else {
    echo 'Email sending failed.';
}
?>- Ensure Proper DNS Setup:
- To avoid emails being marked as spam, ensure your DNS records are correctly configured:
- SPF Record: Helps identify your server as an authorized sender for your domain.
- DKIM: Provides an additional layer of verification.
- PTR Record (Reverse DNS): Ensures that your VPS IP resolves back to your domain.
How PHP mail() Works
- The PHP
mail()function is a built-in feature of PHP that sends emails directly using the server’s local mail transfer agent (MTA), such assendmailorpostfix, without needing an external SMTP server. - It relies on the server’s MTA to handle email delivery, meaning the server itself is responsible for routing the emails to their destinations.
Advantages:
- Simplicity: Since
mail()is built into PHP, it’s easy to use and doesn’t require much configuration if your server’s MTA is correctly set up. - No External Dependencies: It doesn’t rely on an external SMTP server, which means everything is managed on your own server.
Disadvantages:
- Deliverability Issues: Emails sent via
mail()are more likely to be marked as spam or blocked, especially if your server’s IP is not recognized as a trusted mail sender. - Lack of Features: The
mail()function lacks advanced email sending features, such as authentication, encryption, and detailed error reporting. - Server Load: The server itself handles all aspects of sending the email, which can be resource-intensive if sending large volumes of emails.
Option 2: Set Up an SMTP Server on Your VPS
Setting up an SMTP server on your VPS can provide more reliable email delivery.
Steps to Set Up Postfix (Common SMTP Server):
- Install Postfix:
sudo apt-get install postfix
- During installation, select “Internet Site” and enter your domain name.
- Configure Postfix
- Edit the Postfix configuration file:
sudo vim /etc/postfix/main.cf
Alternatively open the file in Visual Studio Code when connected as me via Remote explorer extension.
- Ensure the following settings are configured:
myhostname = yourdomain.com
mydestination = $myhostname, localhost.$mydomain, localhost
relayhost =
- Set Up Email Authentication (Optional but Recommended):
- Set up SASL authentication to avoid your server being used for spam:
sudo apt-get install libsasl2-modules
sudo nano /etc/postfix/sasl/smtpd.conf
Add following:
pwcheck_method: saslauthd
mech_list: plain login
- Restart Postfix
sudo systemctl restart postfix
- Test the SMTP Server:
- Use the same PHP test script as above, but this time ensure your PHP configuration points to Postfix.
How SMTP Server Works
- Setting up an SMTP server (like Postfix) on your VPS involves configuring a dedicated service that handles all email-related tasks, including sending, receiving, and routing emails.
- WordPress, through PHP, communicates with the SMTP server to send emails, which the SMTP server then routes to the recipient’s mail server.
Advantages
- Improved Deliverability: An SMTP server can be better configured for email deliverability, especially when you implement SPF, DKIM, and PTR records.
- Advanced Configuration: You have more control over email sending features, such as authentication, encryption, and throttling.
- Better Handling of Outgoing Mail: The SMTP server manages all aspects of email sending, reducing the load on your web server and improving reliability.
Disadvantages
- Complex Setup: Setting up and managing an SMTP server is more complex and requires a good understanding of email protocols, security, and server management.
- Maintenance: You need to maintain the SMTP server, including updating software, managing security settings, and monitoring email deliverability.